

Overview#
Sometimes, you’re forced to twist your way through harsh environments.
You might be dealing with a severe lack of physical resources, or you may feel awkward asking for additional IP allocations.
In this post, I’ll share my trial-and-error journey of attempting to build an OpenShift cluster using only two bare-metal servers and just two externally accessible IP addresses.
Considerations#
If you’re reading this, you’re probably already familiar with what OpenShift is.
It’s an enterprise-grade container orchestration platform built by Red Hat on top of Kubernetes.
Compared to Kubernetes, which allows flexible node configurations, OpenShift is fairly strict by default.
A standard cluster typically consists of 3 master nodes and 3 worker nodes.
There is a Single Node OpenShift (SNO) option that runs on a single node,
but since my goal required utilizing both bare-metal servers, I excluded it from consideration.
First Attempt: Using a Proxy#
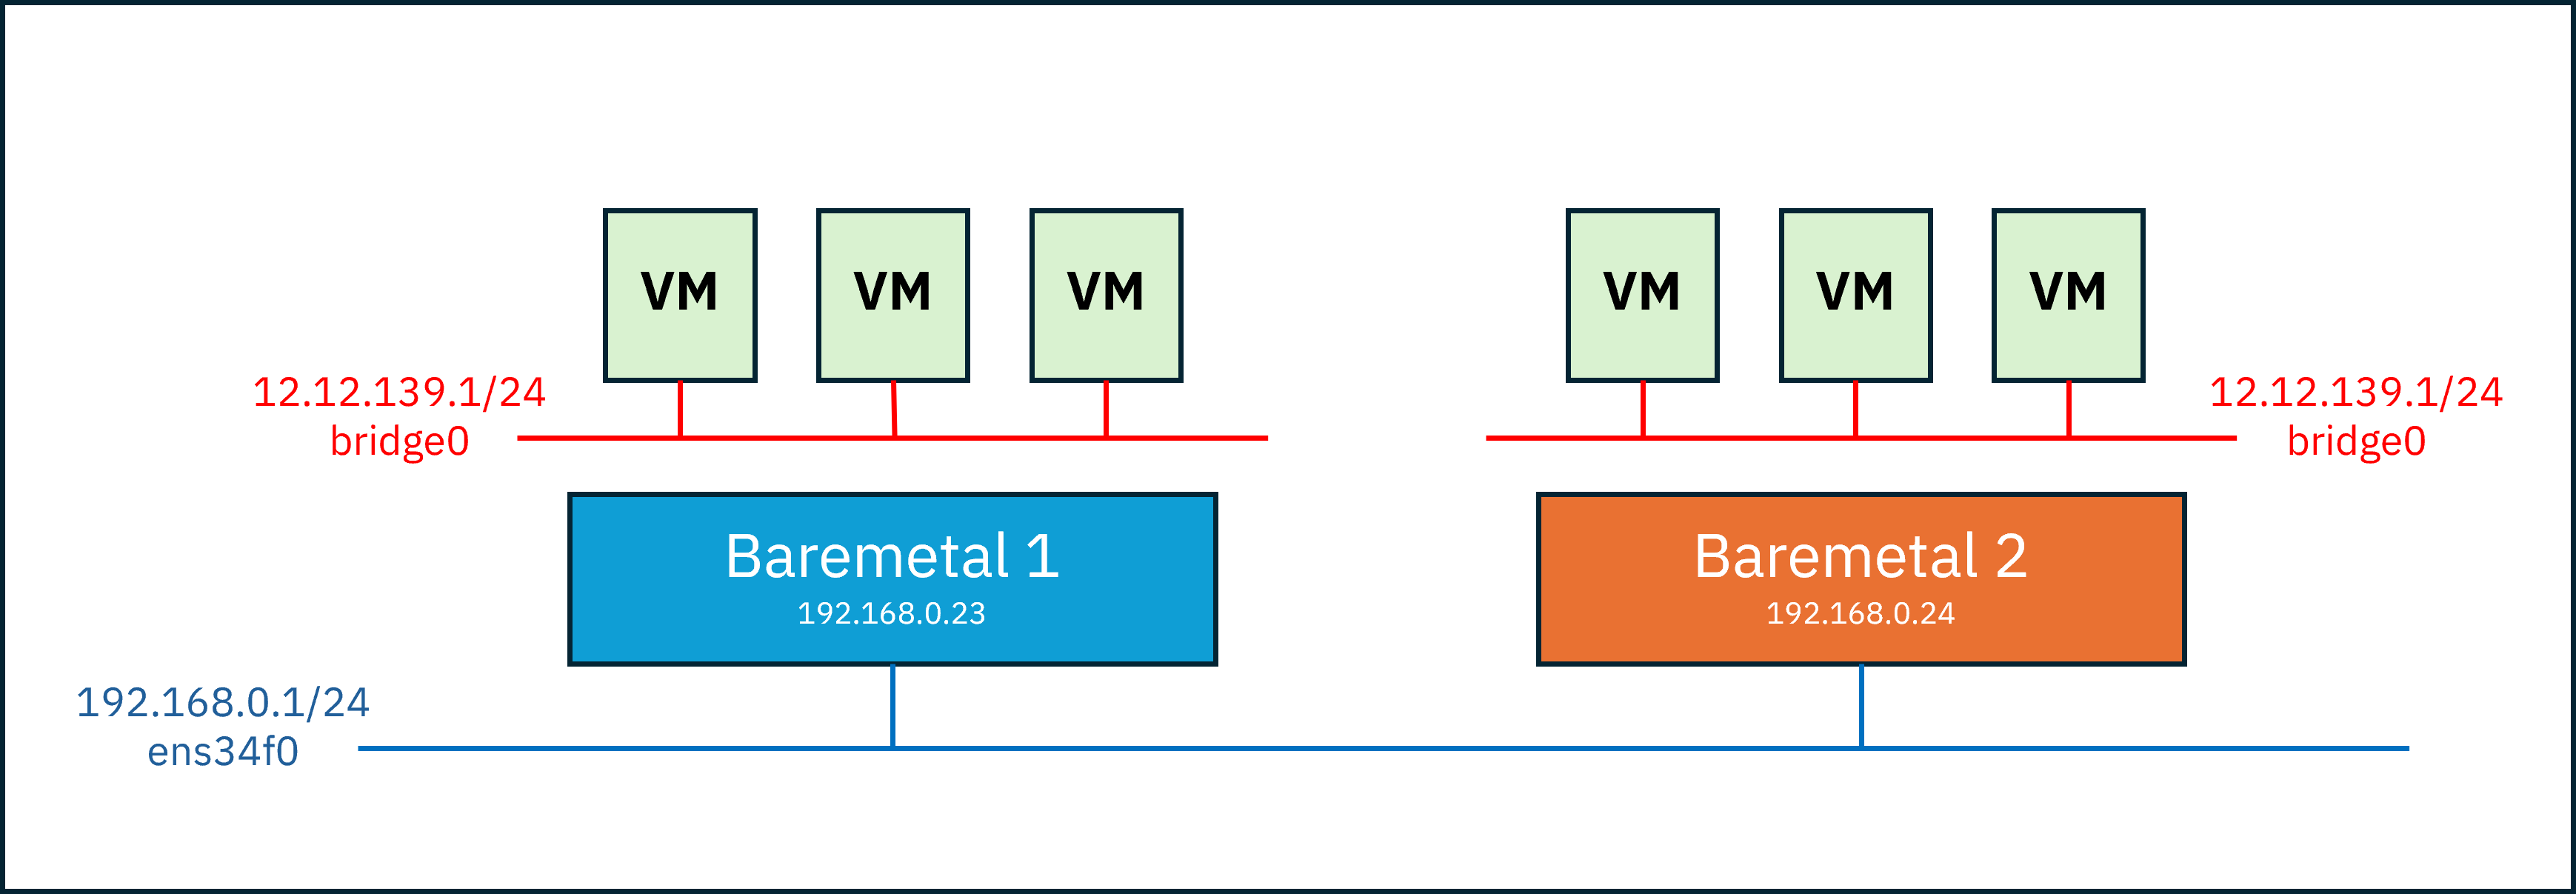
I only had two physical servers and two public IP addresses accessible from outside.
Using these, I needed to create 3 masters and 3 workers as VMs and allow them to communicate with each other.
However, each VM only has an virtual IP and cannot directly reach beyond it.
So how could a VM reach another physical server?
My first idea was to create the VM network in bridge mode (since NAT prevents inter-VM communication)
and then rely on the host network to perform packet forwarding and IP masquerading.
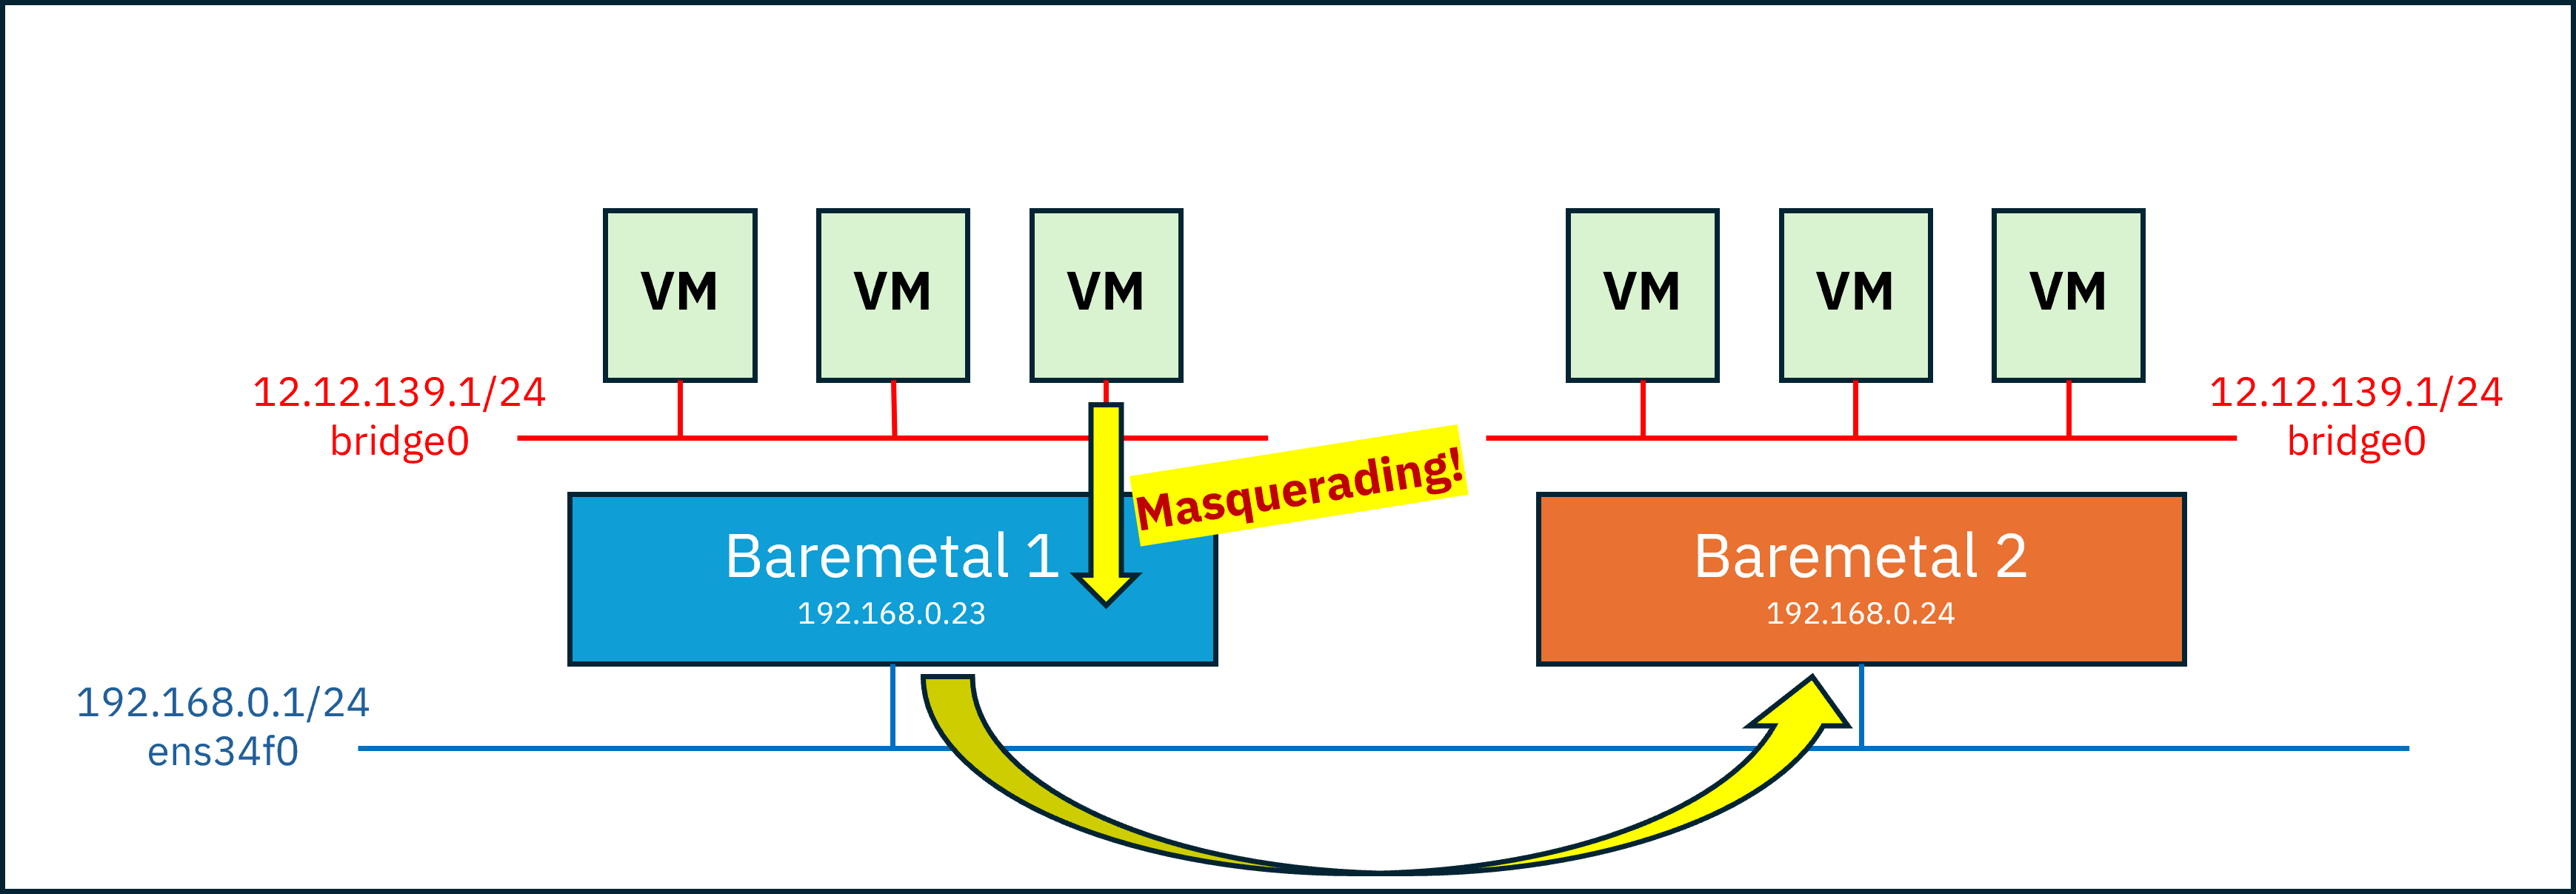
With this setup, VMs could reach the other host through Host 1.
However, even after reaching Host 2, they still couldn’t reach the internal VMs,
because the packet destination was the IP of Host 2 itself.
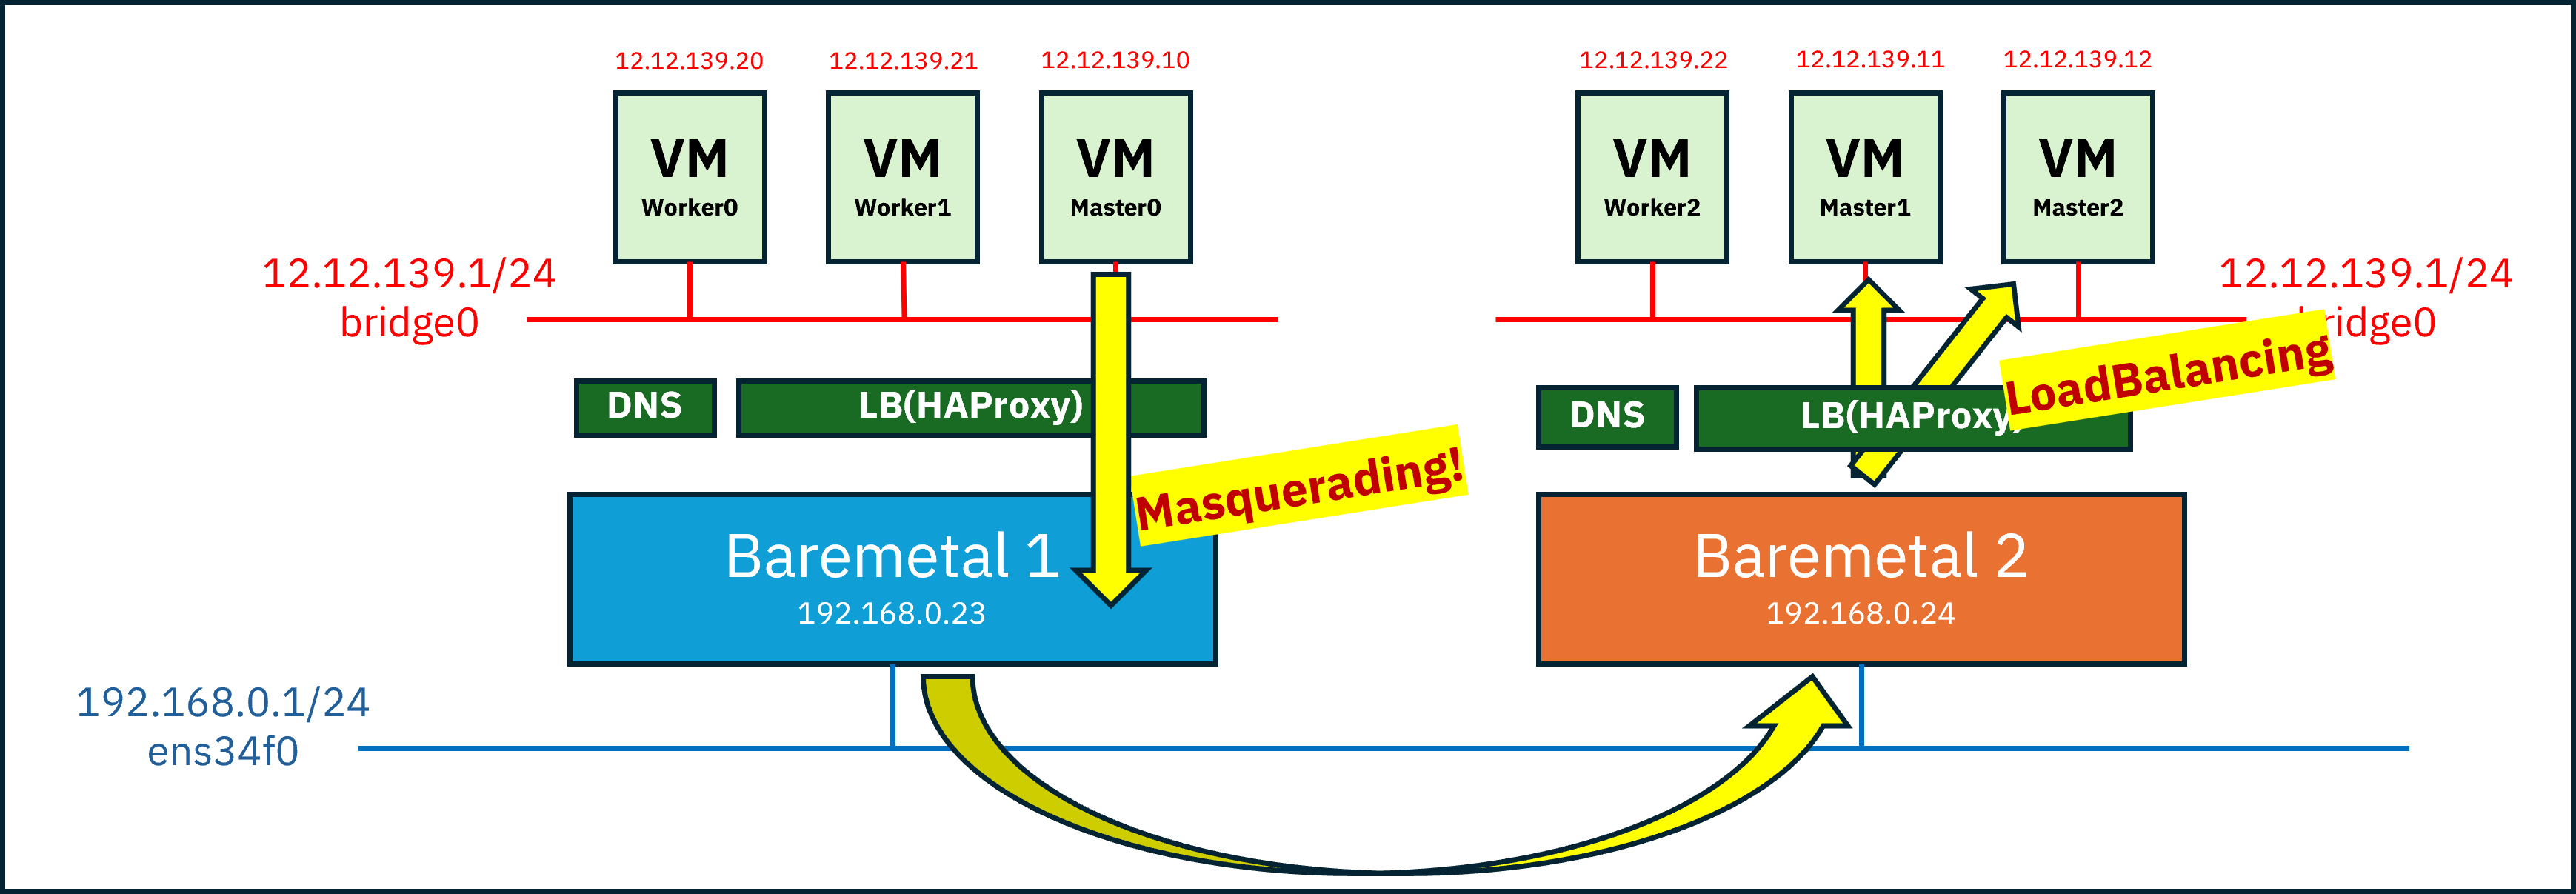
To address this, I considered placing a load balancer (proxy) on each host.
OpenShift already requires a load balancer in front due to the specific roles of certain ports, for example:
- 80(
http), 443(https) -> worker pool - 6443(
api), 22623(mc) -> master pool
Since Kubernetes primarily communicates over HTTP rather than raw IP connections,
I initially thought this approach would be sufficient.
example scenario:
- Assume master0 needs to contact master2 for an etcd heartbeat or similar purpose
- DNS resolves the IP of master2, which corresponds to Baremetal 2
- A packet is generated with source master0 (
12.12.139.10) and destination Baremetal 2 (192.168.0.24:22623)- Due to packet forwarding and masquerading, the source becomes Baremetal 1 (
192.168.0.23) and is routed to Baremetal 2- Upon arrival, the load balancer on Baremetal 2 forwards the packet to either master1 or master2 based on port
22623
Problem Encountered#
Although the OpenShift installation initially appeared to proceed normally,
I soon discovered that certain pods attempted to communicate directly via node IPs, not via HTTP.
Because these packets targeted specific node IPs rather than just the host IP for load balancing,
they failed to reach the intended nodes correctly.
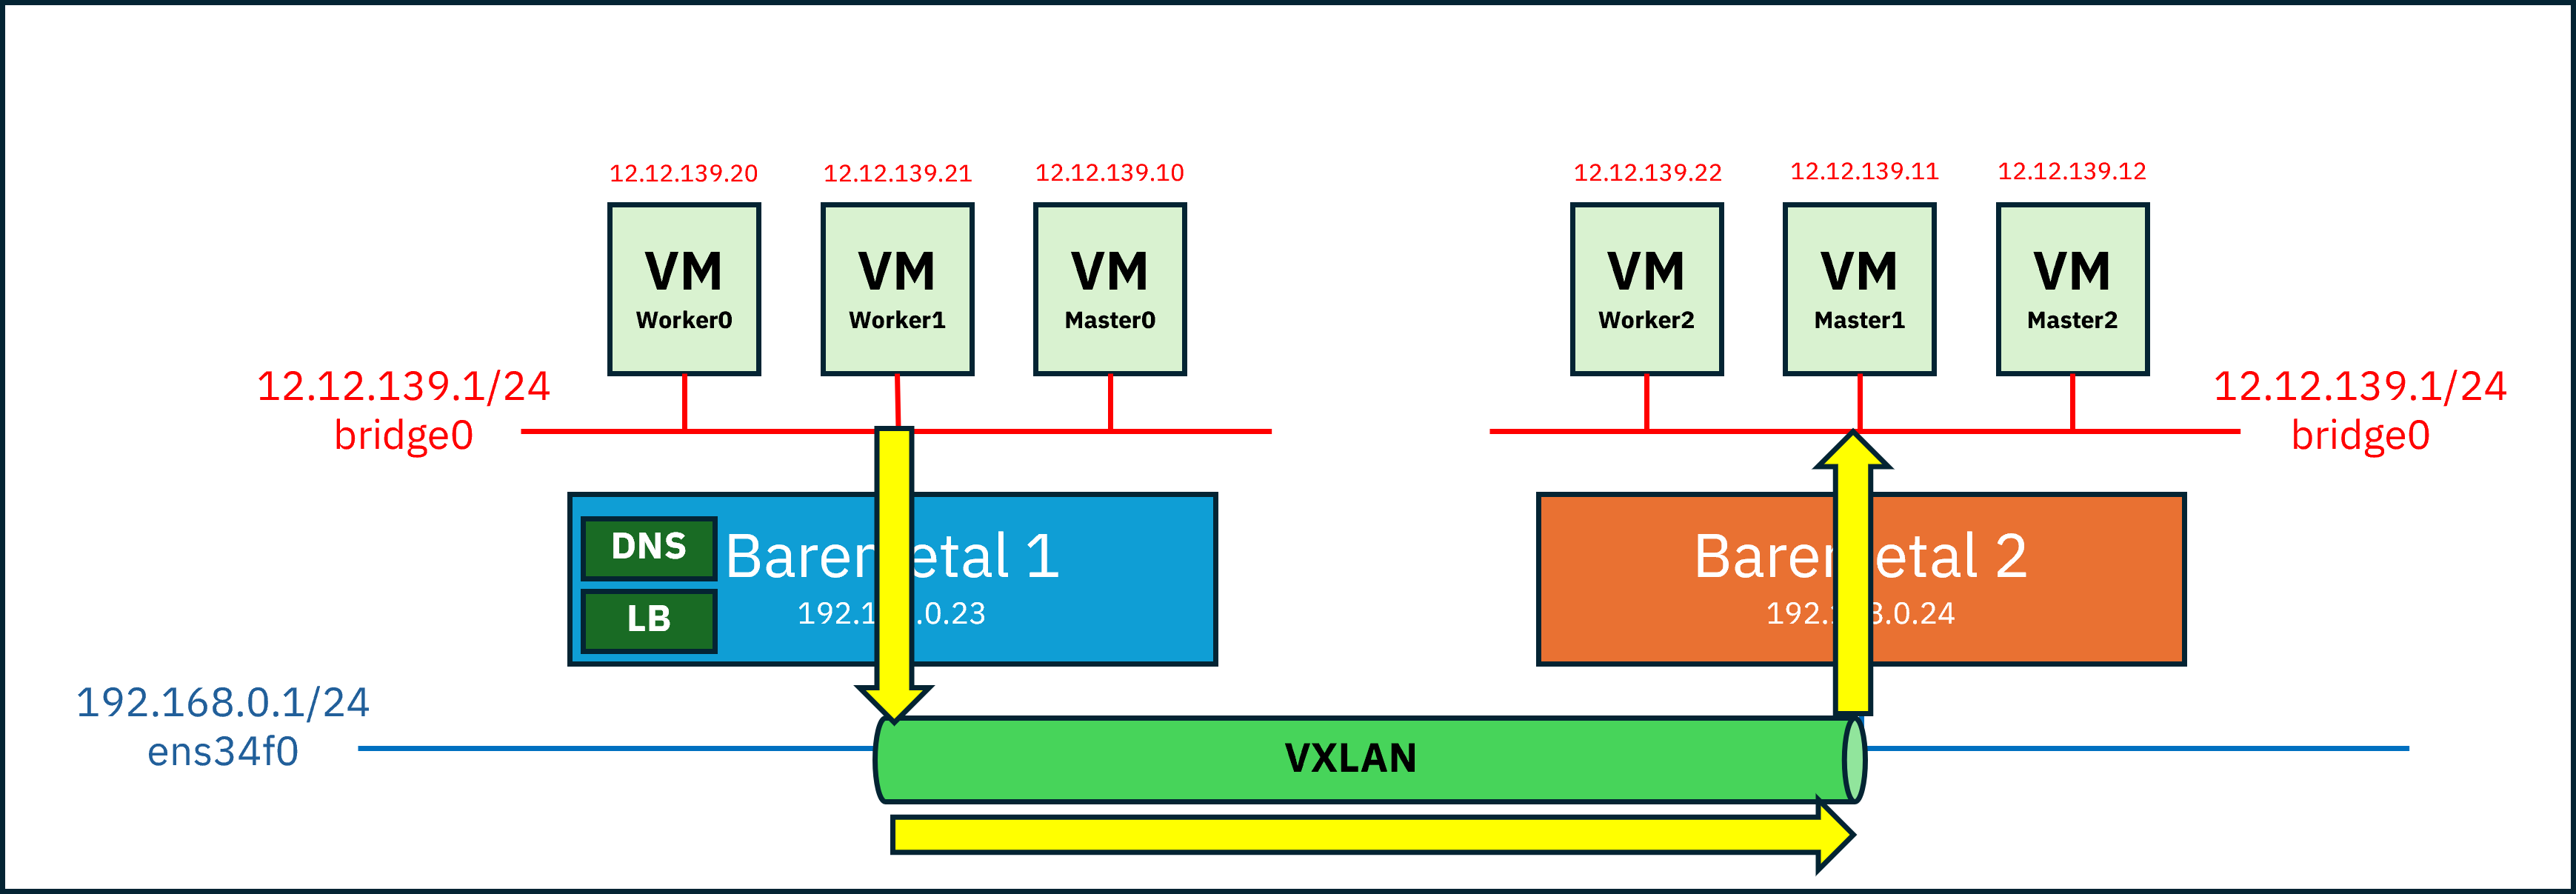
Second Attempt: VXLAN#
To allow direct communication such as Master0 (Baremetal 1) → Master2 (Baremetal 2) by IP,
VMs needed to be able to directly reach VMs on the other host.
This led to my second idea: creating an L2 tunnel using VXLAN.
VXLAN?#
VXLAN (Virtual eXtensible Local Area Network) is a technology that uses UDP to allow devices to communicate as if they were on the same L2 network, even when they are separated across L3 networks.
In other words, it’s a network overlay technology that enables communication beyond the physical IP-based network topology.
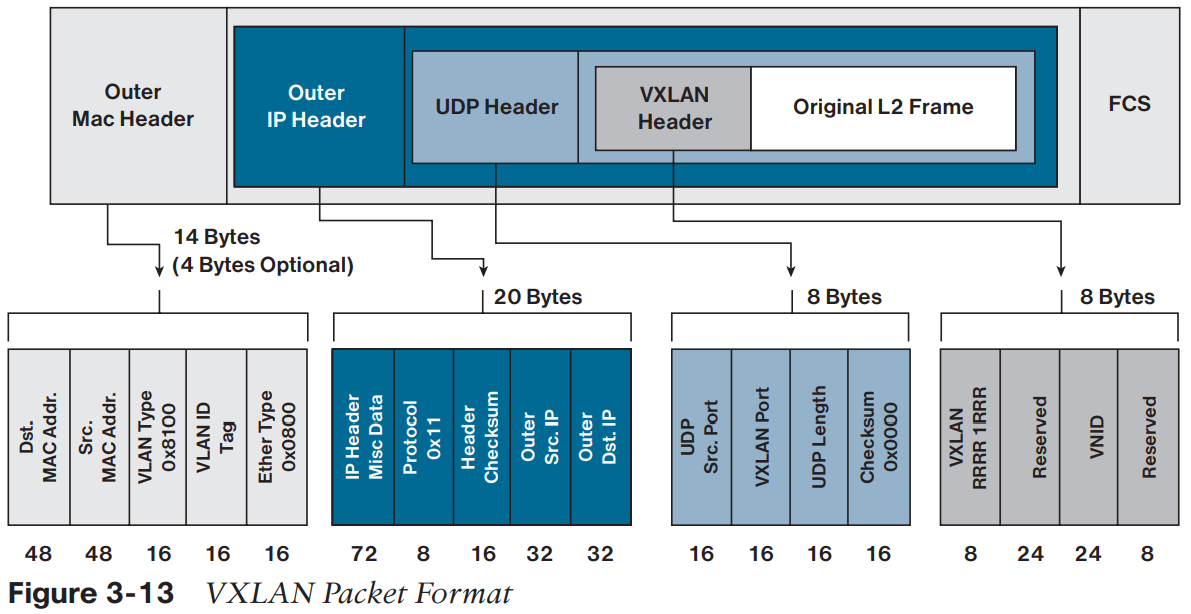
In the diagram above, you can see the original L2 packet wrapped inside a UDP encapsulation:
- Outer Header : Information used for routing in the physical network
- UDP Header : Includes a hash of the inner packet and the VXLAN port (fixed at 4789)
- VXLAN Header : Contains the VNI (VXLAN Network Identifier); only VXLANs with the same VNI can communicate
Let’s walk through the packet flow:
- A packet is created from Master0(12.12.139.10) to Master2(12.12.139.12)
- The VTEP (VXLAN Tunnel End Point) on Baremetal 1 intercepts the packet and recognizes the destination as remote
- The packet is encapsulated with:
Outer IP Src = Baremetal 1 IP
Outer IP Dst = Baremetal 2 IP
UDP dst port = 4789
VNI = 10010- The encapsulated packet is transmitted over the physical network
- The VTEP on Baremetal 2 decapsulates the packet and restores the original L2 frame
- The packet is delivered to Master2
VTEP(VXLAN Tunnel End-Point)
Maps VXLAN segments to tenant devices and performs encapsulation and decapsulation.
Configuring the VXLAN Network#
Now let’s configure the VXLAN network.
First, configure a bridge network (br-vm) for the VM network, then create the VXLAN interface.
Baremetal 1 :
# ip link add vxlan0 type vxlan id 39 dev ens34f0 remote 192.168.0.24 dstport 4789
# ip link set vxlan0 master br0
# ip link set vxlan0 up
Baremetal 2:
# ip link add vxlan0 type vxlan id 39 dev ens34f0 remote 192.168.0.23 dstport 4789
# ip link set vxlan0 master br0
# ip link set vxlan0 up
id : VNI (must be identical on both devices)
ens34f0 : underlay NICremote : IP of the remote tunnel endpoint
To modify the configuration, delete and recreate the interface:
# ip link set vxlan0 down
# ip link del vxlan0
This configuration demonstrates VXLAN with two devices.
For three or more devices,remotecannot be used and a different approach is required.
Next, disable rp_filter
rp_filter controls reverse path filtering, which validates whether incoming packets follow a valid routing path.
Here, we disable it to prevent unintended packet drops.
# cat <<EOF >/etc/sysctl.d/98-rpfilter.conf
net.ipv4.conf.all.rp_filter=0
net.ipv4.conf.default.rp_filter=0
net.ipv4.conf.ens34f0.rp_filter=0
net.ipv4.conf.br-vm.rp_filter=0
net.ipv4.conf.vxlan0.rp_filter=0
EOF

# sysctl --system
At this point, the VXLAN network is complete.
VM-to-VM communication is now possible, but if packets must exit to the public network, NAT is required.
First, configure MASQUERADE:
# iptables -t nat -A POSTROUTING \
  -s 12.12.139.0/24 \
  -o ens34f0 \
  -j MASQUERADE
-t nat -A POSTROUTING : after route decision-s 12.12.139.0/24 : source subnet-o ens34f0 : outgoing interface-j MASQUERADE : SNAT, rewrites source IP
Finally, define forwarding rules:
# iptables -A FORWARD -i br-vm -o ens34f0 -j ACCEPT
# iptables -A FORWARD -i ens34f0 -o br-vm -m state --state RELATED,ESTABLISHED -j ACCEPT
# sysctl net.ipv4.ip_forward=1
This results in:
- Allow all outbound traffic from
br-vmtoens34f0 - Allow only response traffic from
ens34f0back tobr-vm
Outbound traffic is unrestricted, while inbound traffic is limited to responses.
Problem Encountered#
Although VXLAN enabled direct VM communication, a new issue arose:
TLS handshake timeouts caused by MTU mismatches.
At first, this was extremely frustrating—but let’s break it down calmly.
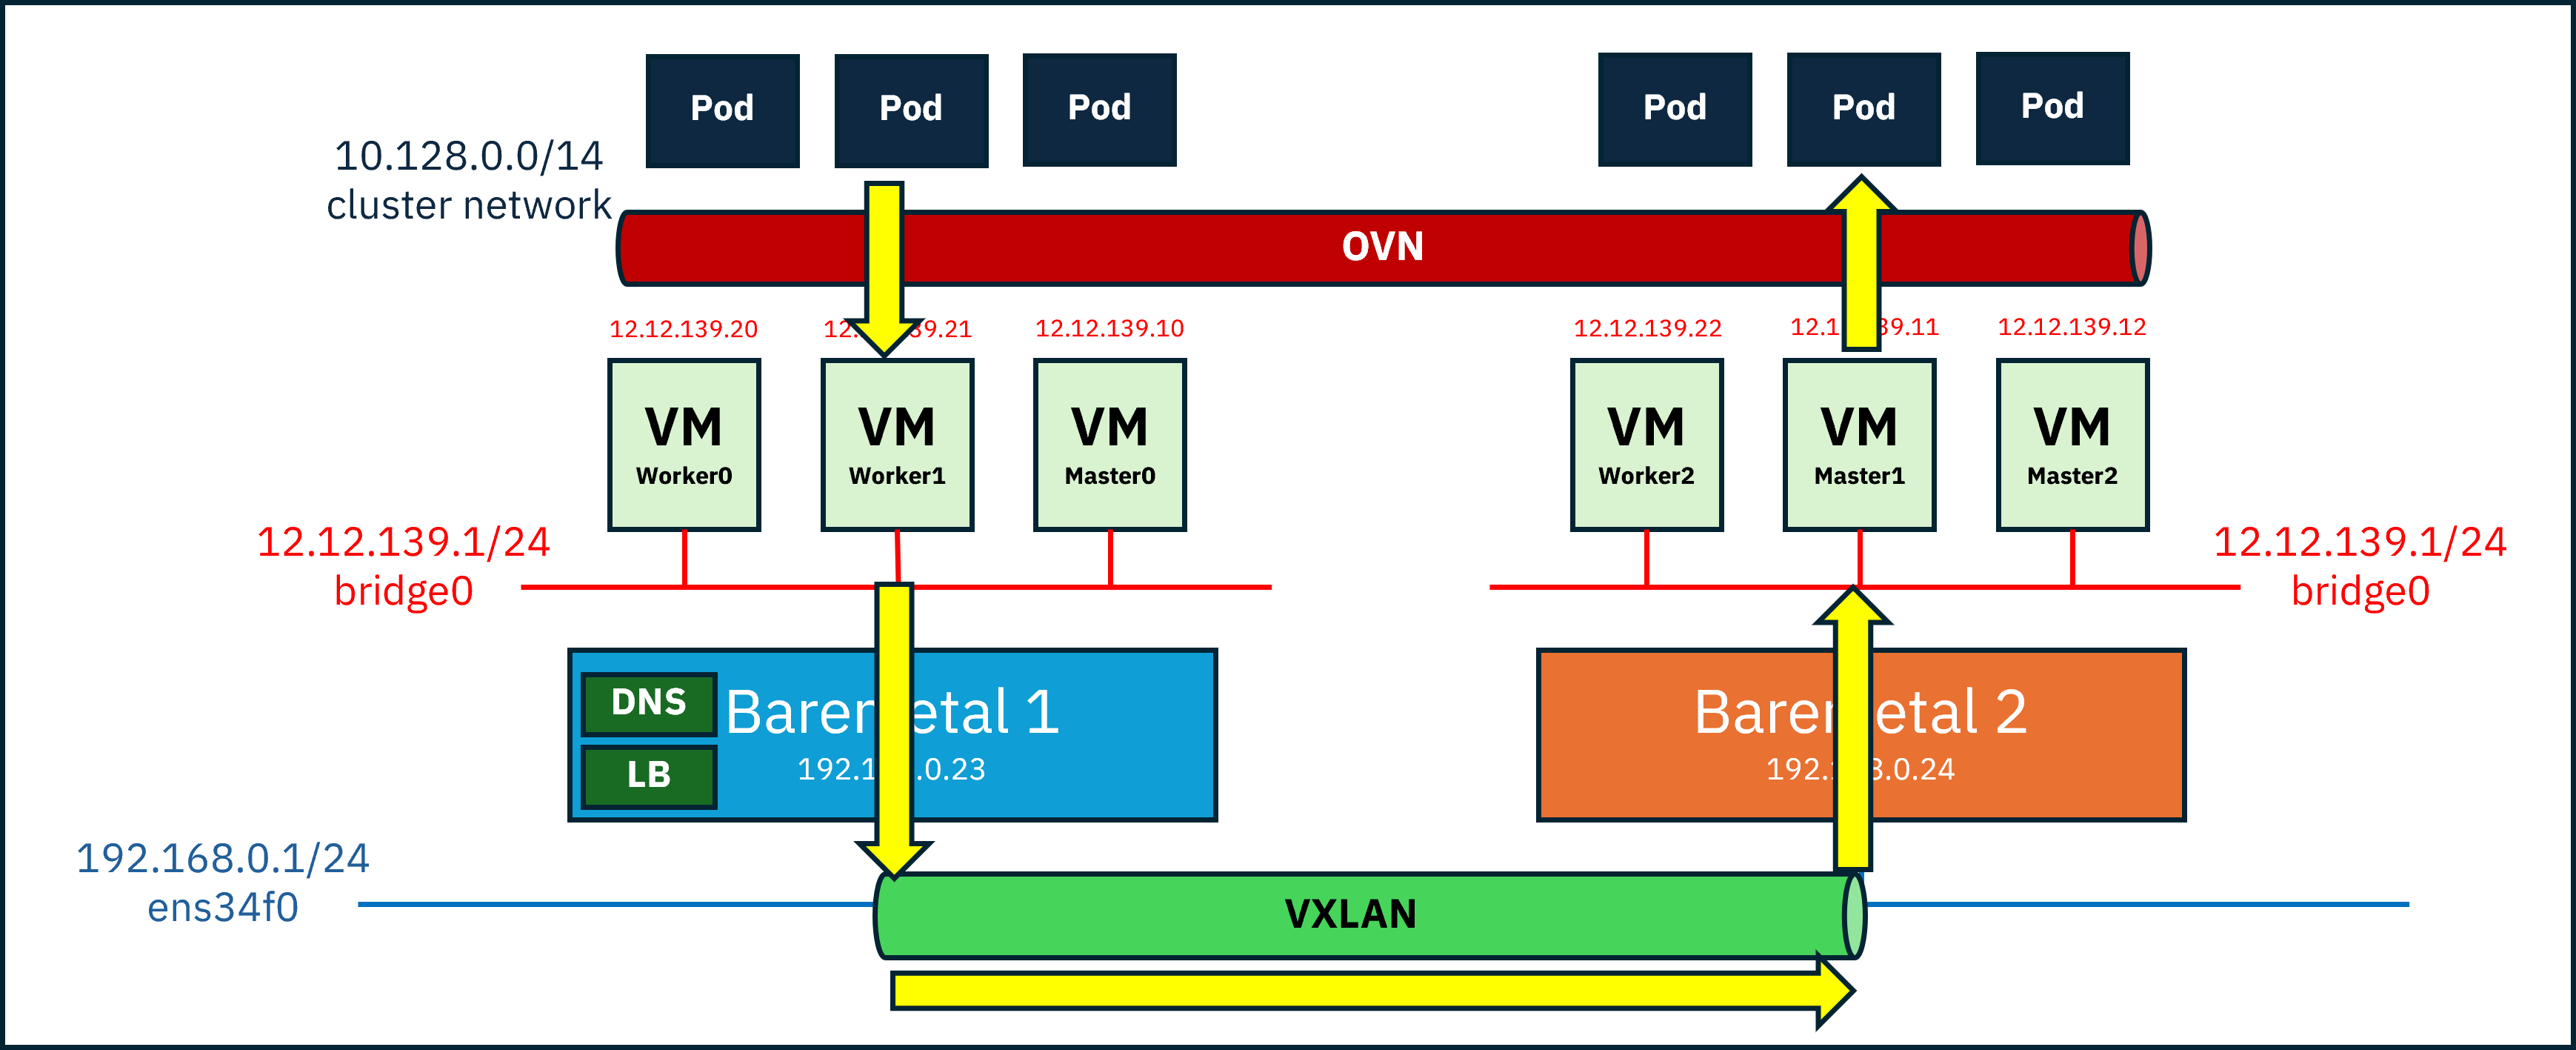
While VM-to-VM communication might work fine, the real problem is that we’re installing OpenShift.
OpenShift itself runs pods on top of another overlay network (default: OVN-Kubernetes).
Overlay networks add extra headers, which means the original packet size must be reduced to stay within the physical MTU limit.
MTU (Maximum Transmission Unit) is the maximum frame size that can be transmitted at once.
If the physical NIC MTU is 1500 bytes, all headers and payload must fit within that limit.
Overlay encapsulation typically requires at least ~50 additional bytes,
meaning VM packets must be 1450 bytes or smaller.
Without reducing the VM MTU, small packets like ping may work,
but larger packets required for TLS handshakes will time out.
In our case, we were stacking two overlay networks, so timeouts were almost inevitable.
Third Attempt: Reducing MTU#
Fortunately, the fix was simple.
I checked the MTU of the physical NIC,
then configured the VM’s main NIC with an MTU 100 bytes smaller, and installed OpenShift.
When OVN was set up during installation, it automatically reduced the MTU further for the pod network.
Installation complete 🎉
WARNING!!!
This configuration should only be used for testing or very limited environments.